Managing Accessions
Day-to-day work in the Accessions section: finding, sorting, editing, assigning, and deleting accessions.
The list
Accessions in the left sidebar opens the list of every accession your account or organisation can see.
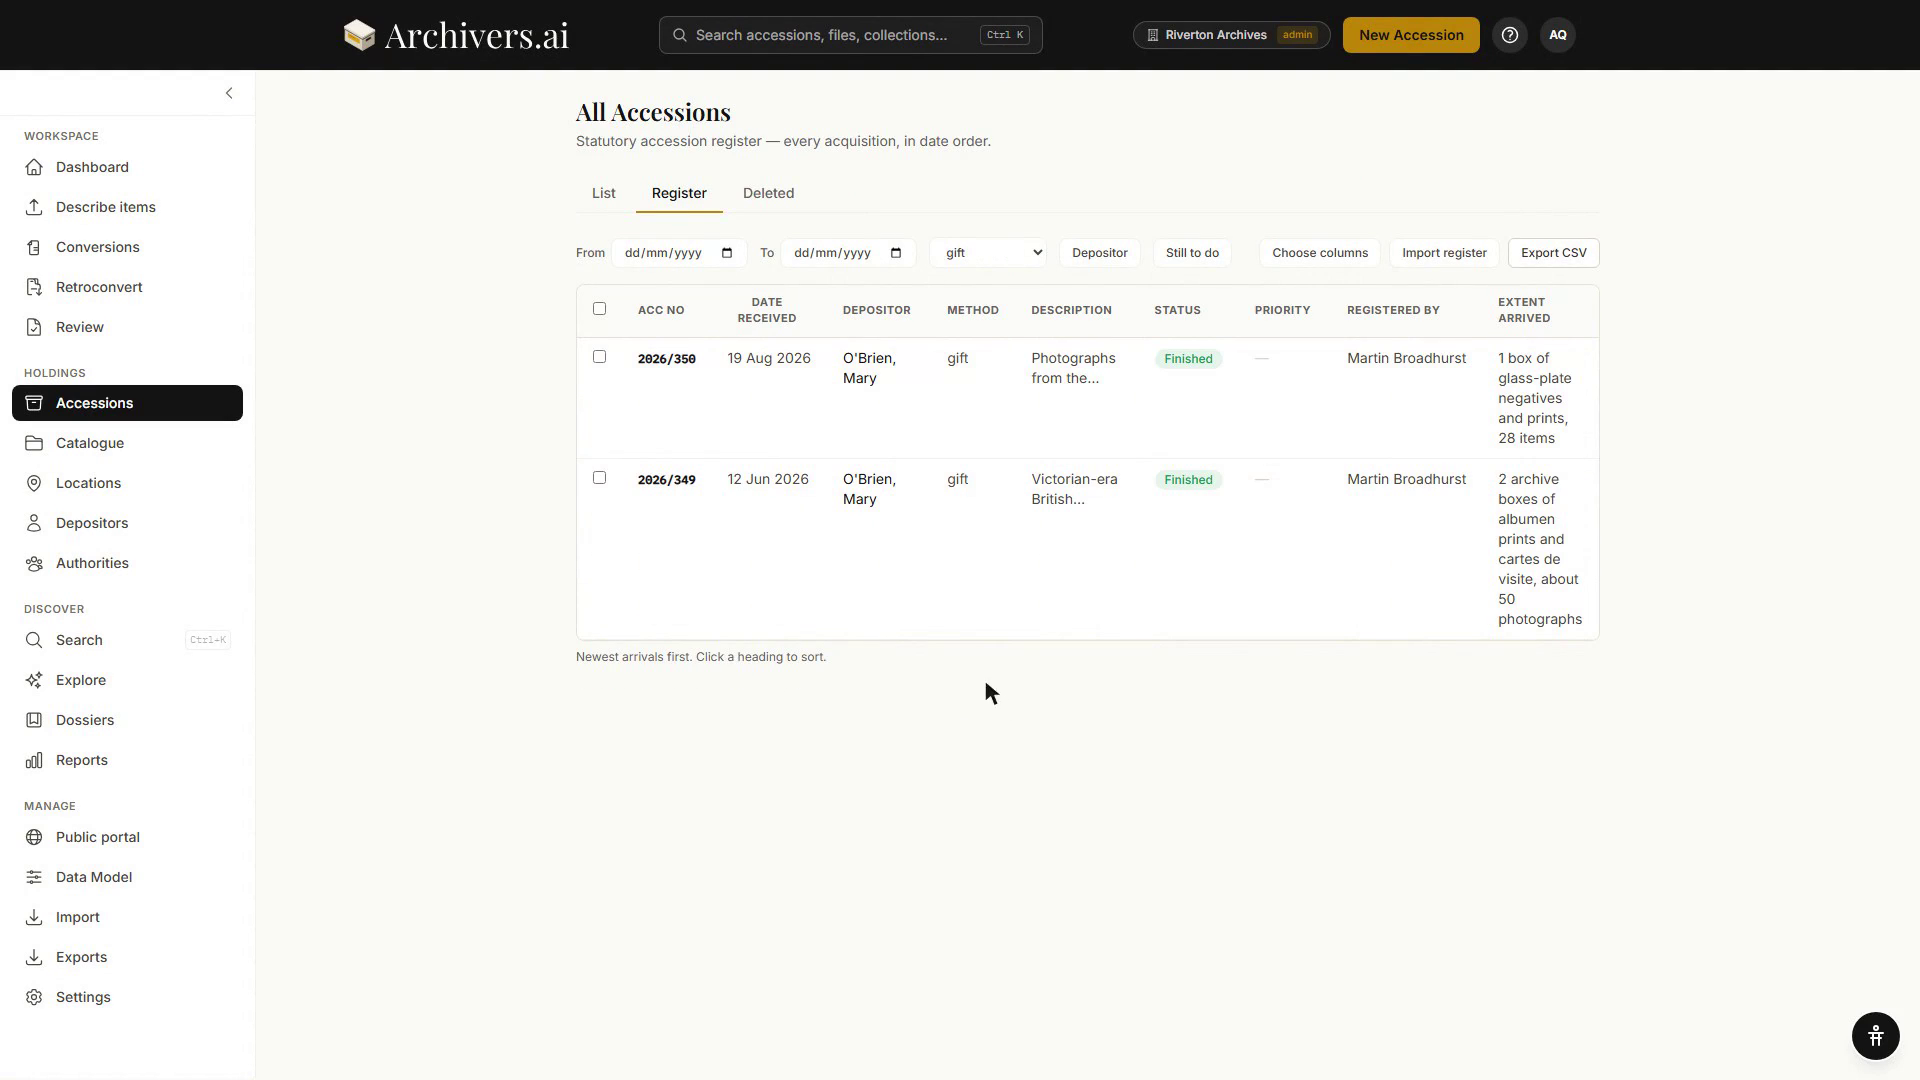
The Register tab is the statutory accession register — every acquisition, in date order. Each row starts with a tick box for selecting it, then the accession number, date received, depositor, method, description, status, priority, who registered it, and the extent that arrived. Click a heading to sort.
Above the table sit Choose columns (pick which columns the register shows), Import register and Export CSV, alongside the From / To date pickers, the method dropdown, and the Depositor and Still to do filters. There are no per-row edit or delete icons — open the accession to change it.
Filters at the top
| Filter | What it does |
|---|---|
| Search accessions… | Full-text search across name and description |
| All / Documents / Photographs / Artefacts / Audio / Video | Filter by collection type |
| All Fonds dropdown | Show only accessions assigned to a chosen fond, or Unassigned |
| Collection analysis | Not analysed / Stale / Analysed |
| Portal state | Public / Scheduled / Private |
| Date range | From / to date pickers, with Clear dates |
| Newest first sort | Oldest first, or Most items |
The list view / table view toggle (top right) lets you switch to a denser, spreadsheet-style table — useful when you have dozens of accessions to scan.
The Select to Explore button puts the list into multi-select mode so you can pick a batch of accessions and launch a Research & Explore session over them.
Opening an accession
Click the title to open the accession.
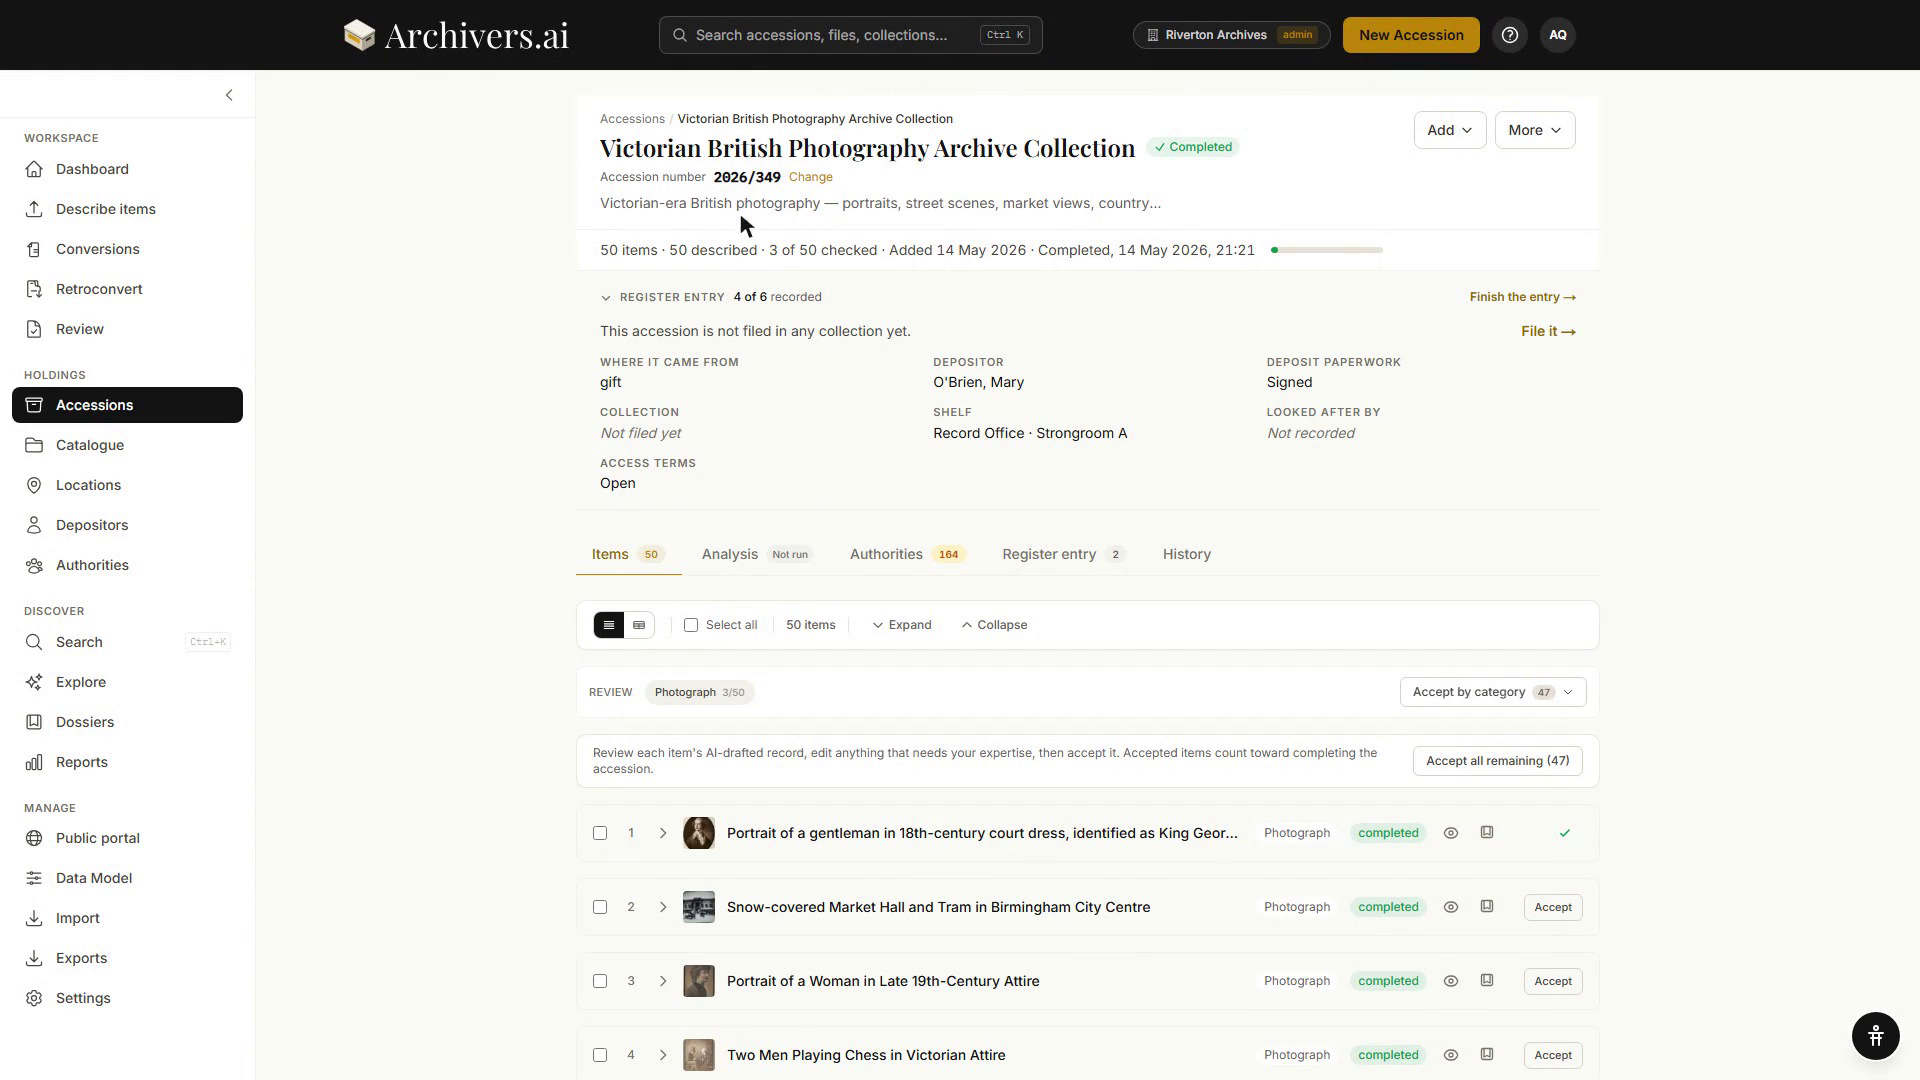
You'll see:
- Header — title, completion status, linked-authorities summary, fond assignment, file count, processed count, dates, review progress.
- Tabs — Items (per-file metadata), Analysis (collection-level summary), Authorities (linked subjects, people, places, organisations), Register entry (the acquisition details) and History (what changed, by whom).
- A single primary button naming the next thing to do — Carry on describing, Check the records, Complete this accession, Start processing or Add a record without a file, depending on where the accession has got to.
- Add menu — Add files, Add a record without a file.
- More menu — Explore, Add to Dossier, Read the records again, Carry on describing, Publish to portal / Manage portal publication, Complete this accession or Mark as still in progress, Suggest where these belong, the deaccession actions, and Delete.
- Export panel at the bottom — quick links to PDF Report, BagIt, EAD3, AtoM CSV, ArchivesSpace CSV, Archivematica CSV, and the Other formats drawer.
Filing under a fond
The Linked to panel reads Not filed yet until the accession is placed. Choose a fond, sub-fond, series, or sub-series and the accession moves into your archival hierarchy at the level you pick. More → Suggest where these belong proposes a placement if you'd rather be prompted.
See Assigning accessions for the full workflow.
Editing metadata after completion
A Complete accession isn't locked.
- Expand any item on the Items tab to edit its fields. On that tab, you can also switch to columns view (the cog icon) to see all your data-model fields as sortable and filterable columns — useful for scanning large accessions and spotting patterns across items.
- Click the title on the accession header to rename or update description.
- Add → Add files puts new files into an existing accession — they go through the same processing pipeline.
The accession's status remains Complete; edits don't roll it back to Draft.
Recording a deaccession
Material that has left the archive is not deleted — it's recorded. More → Record a deaccession opens a form that states the point of the act plainly: nothing is deleted — the entry stays in the register and in the catalogue, marked, so anyone who comes looking can see what happened to it. On the public portal such a record says only The archive no longer holds this material — never the reason, the recipient or the authority.
If you recorded one in error, More → This was recorded by mistake withdraws it: the deaccession record stays, marked withdrawn, and the entry stops being marked as deaccessioned.
An accession with no files
Not every acquisition is digitised. Add → Add a record without a file creates a catalogue record for paper-only material, and on an accession with nothing in it that act is the page's primary button. Such an accession can be completed in the usual way once its register entry is filled in.
Deleting an accession
Open the More menu in the top right and select Delete. A confirmation dialog will appear.
To prevent accidental deletion, you must type the word DELETE in the text field to confirm. Once typed, the Delete accession button activates.
Deleted accessions enter a recovery state and remain viewable for 28 days. During this time, anyone who could delete can Bring it back, or a workspace admin can Delete for good to permanently remove it. After 28 days, deleted accessions are automatically purged and cannot be recovered.
Card view delete. You can also delete an accession from the card view on the Accessions list. Hover over the card and click the trash icon, then confirm in the same typed-confirmation dialog.
Viewing and recovering deleted accessions
Click the Deleted tab in the Accessions view to see all deleted accessions within their 28-day recovery window. The list shows:
- Who deleted it
- When it was deleted
- Days remaining before permanent deletion
Click an accession to restore it, or ask an admin to permanently delete it if you're certain.
Possible duplicates
After a file is processed, Archivers.ai automatically checks it against your existing archive for potential duplicates using AI similarity matching. Files that may be duplicates appear with an amber Possible duplicate badge on the Items tab.
What to do if you see the badge:
- Click the badge to open a panel showing candidate matches — other items in your archive with similar content.
- Compare — click any candidate to see it side-by-side with your file.
- Decide — if it's actually a duplicate (a scan that shouldn't have been ingested twice, for example), delete the duplicate accession or item. If it's not a duplicate, click Not a duplicate to dismiss the flag for this pair.
Dismissed flags are remembered — the same pair won't appear as a potential duplicate again. If your archive changes and matches no longer align, stale flags are automatically cleared.
The duplicate check excludes files from the same accession (multi-page scans are legitimately similar) and only compares completed, non-deleted items.
Bulk operations
Tick rows in the table view (or use Select to Explore on the card view) and a bar appears with:
- Assign to fond and Assign location
- Analyse — run collection analysis over each selected accession
- Explore — start a research session over the selection
- Add to Dossier
- Publish to portal… and Unpublish (with a reason), for those who may publish
- Delete
Item-level bulk operations live inside the open accession — see Reviewing classifications.
See also
- Creating and linking depositors — record who this material came from
- Setting up storage locations — record where it physically lives
- Publishing, scheduling, and unpublishing — share an accession on the Public Portal
- Export formats