Starting a Retroconversion Project
This walkthrough takes you through the retroconversion wizard from start to uploading your source.
1 · Target collection
From the sidebar, click Retroconvert. Everything happens on one page, in three numbered sections.
- Collection (fonds) — the fonds-level collection the new records will file into. If there isn't one yet, Create a new collection… is in the same picker, or bulk-create some from the import wizard.
- Structure template (optional) — stamps an arrangement skeleton onto the collection before filing, so entries can be classified into its series. Leave it on No template — use existing arrangement to file into whatever is already there.
- Former reference prefix (optional) — the catalogue's running numbers are recorded with this prefix. Type
PRand the printed number1000is stored asPR1000. Entries already carrying the prefix are normalised, not doubled. - What reference should each entry get?
- A new number under this collection — the number printed in the catalogue is kept as the entry's former reference, so an old citation still finds it.
- The number printed in the catalogue — kept as it reads. Choose this when the catalogue's own numbers are the ones your readers cite. An entry with no printed number still gets one under this collection.
- When should these records go into your catalogue? — either somebody checks them before they go in, or they go in as they're read. It arrives pre-set from your workspace's own answer in Settings → Retroconversion. A volunteer's records are always checked by someone else first.
Starting a run needs an archivist seat.
2 · Source catalogue
Upload one PDF, or photos of each page (JPEG, PNG, WebP or TIFF) — not both. Drop them on the upload area, or click to browse.
If you're bringing photos:
- Each one appears as a row with its page number and filename
- Reorder with Move earlier / Move later, and add more with Add more photos
- Click Use these N pages — the system binds them into one document to read from
The assembly process:
- Rotates each photo to the correct orientation (using embedded metadata)
- Downscales them to a consistent size (long edge capped at 2600 pixels)
- Flattens them to white background (so they look like scanned pages)
- Encodes them as JPEG at consistent quality
The assembled PDF is then processed like any scanned document — retroconversion sees one source, and every page still links back to its original photo.
3 · Extract entries
Click Extract entries. If anything is still missing — no collection chosen, no source uploaded — the page says what, under the button, rather than leaving it dead.
Reading happens on our server, so you can close the tab and come back. The run reappears under History on the same page.
Tips
Uploading many photos? The wizard can handle up to 200 photos in one go. If you have more, you can run multiple batches — each with its own project workspace.
Want to start over? Click Replace beside the uploaded source to clear it and choose a new one.
Technical limits? Up to 200 photos per assembly. How many pages a PDF may have depends on your plan — the free tier is capped tightly, paid tiers much less so, and the refusal names your plan's limit if you hit it. Each photo must be under 50 MB (which shouldn't be a problem for phone photos — even high-res ones are usually 3–8 MB).
What happens next
Once you've confirmed your source, you'll see:
- Progress indicator — the system processes the document (classifies it, prepares it for extraction)
- Catalogue notes — text the reading found that belongs to the collection rather than to an item (scope and content, related material, accruals) comes back as a proposal; tick the ones you want and click Apply selected
- Review interface — the extracted records appear, each shown beside its source page
Once the extraction is complete and there are records ready to review, the system takes you straight to the verification screen — the split-view review interface where you see each entry beside its source page. This is where the work happens: reading down the photograph and down the list together, checking or adjusting entries as needed.
The verification screen is the same one conversions batches use, so it looks like this (the screenshot below is a conversions batch of photographed day book pages):
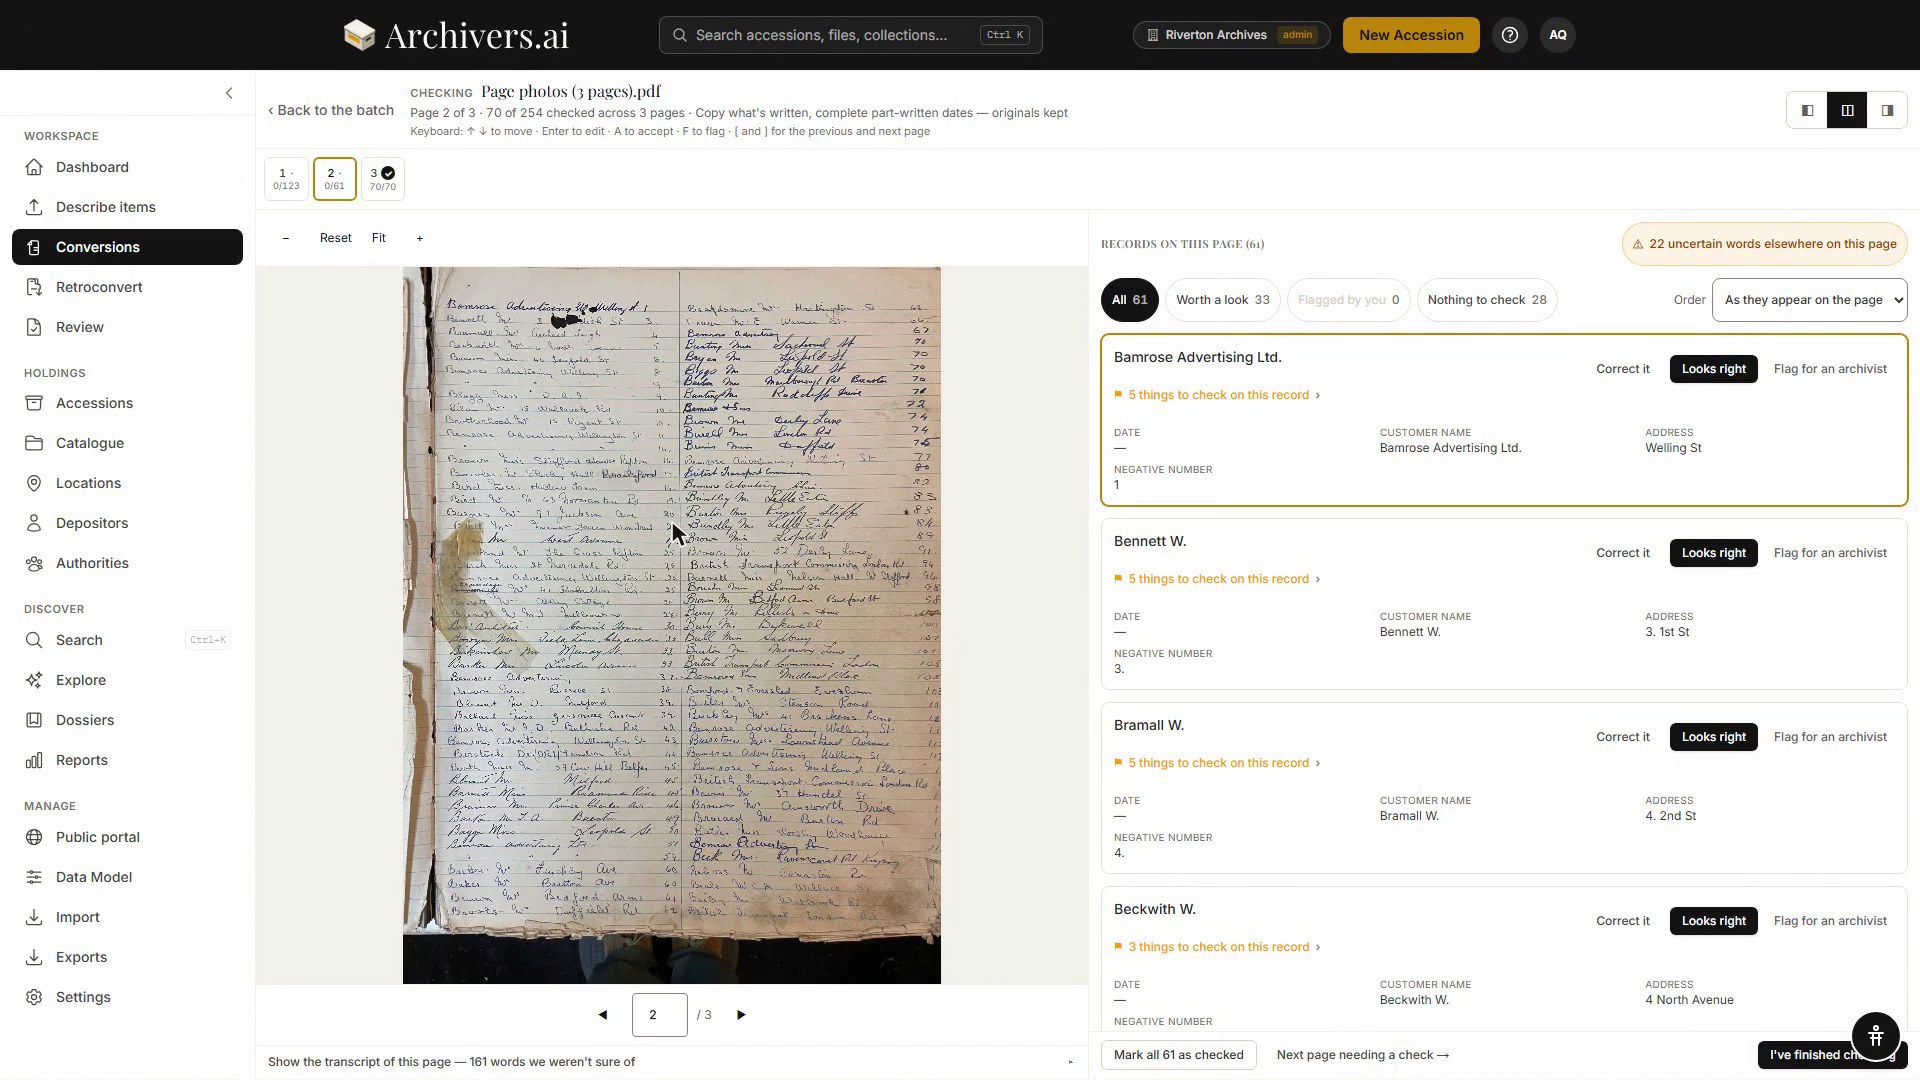
From there, you review each record, flag anything uncertain, and commit the ones you approve to your collection.
Starting another run
Go back to Retroconvert and fill the three sections in again. Every past run is listed under History on the same page, so you can pick one up again at any point.